

Gamifying the Pwnagotchi
31 Oct 2021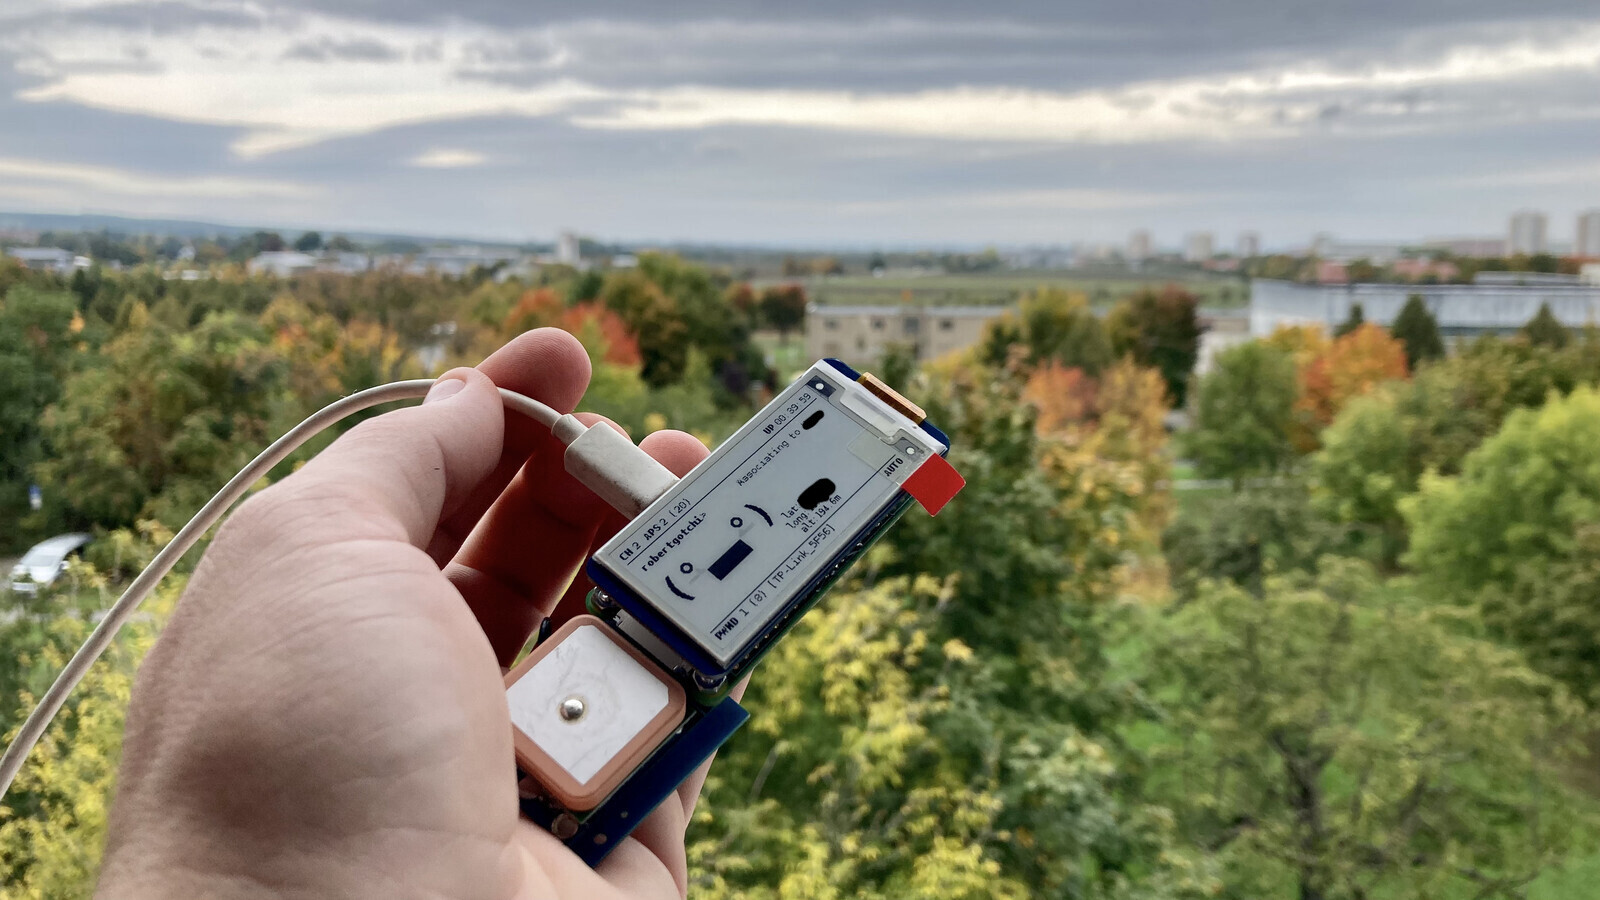
The Pwnagotchi is an “AI” that learns from the WiFi environment and instruments bettercap in order to maximize the WPA key material (any form of handshake that is crackable, including PMKIDs, full and half WPA handshakes) captured.
What’s included?
The simplest Pwnagotchi you can build consists of a Raspberry PI Zero W and an SD Card containing the Pwnagotchi image
Feed the Raspberry PI with USB power and you’re good to go. Pwnagotchi will start capturing handshakes, and storing them into a handshakes folder on root’s homedir. That’s it? Ain’t it.
What’s not included?
E-Ink display
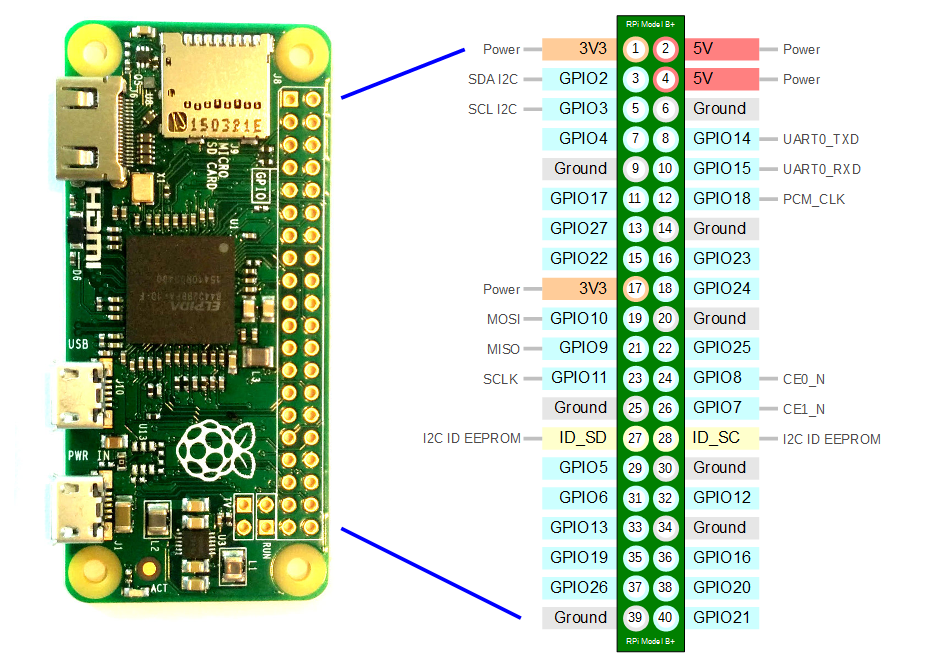
Pwnagotchi supports a couple of e-ink displays out of the box. Just plug into the GPIO header and see the action. In my case, my Raspberry PI Zero W didn’t have the GPIO headers so I had to solder the 8 i2c interface wires directly on the board. I found a useful pinout image here to do that. I’ve used some short wires to interconnect both GPIO interfaces.

Here’s my current configuration on /etc/pwnagotchi/config.toml
ui.display.enabled = true
ui.display.rotation = 180
ui.display.type = "waveshare_2"
ui.display.color = "black"
Now you’re able to see the Pwnagotchi status, along with some cool messages and the count of captured networks, uptime, etc.
Geolocation for handshake captures
Pwnagotchi also supports GPS! Along with each .pcap capture file, if the capture was done aided by GPS data, then Pwnagotchi will store also some GPS metadata in a file:
TPLinkFAE2_84d8xxxxxxxx.gps.json
TPLinkFAE2_84d8xxxxxxxx.pcap
Which GPS unit?
I’ve used the cheapest, most known (by DIYers) serial GPS unit: The good ‘ol U-Blox Neo-6mv2. This is a cheap GPS unit with serial output and included antenna.
- The good? Cheap, easy to get to work.
- The bad? The antenna is not that sensitive so you may have a bad time trying to reach a satellite connection if the sky is cloudy or if it’s raining.
I’m curious about how the new U-Block GNSS Neo 8M units behaves. I’ll write about them someday.
Wiring the GPS unit to the Raspberry PI Zero W
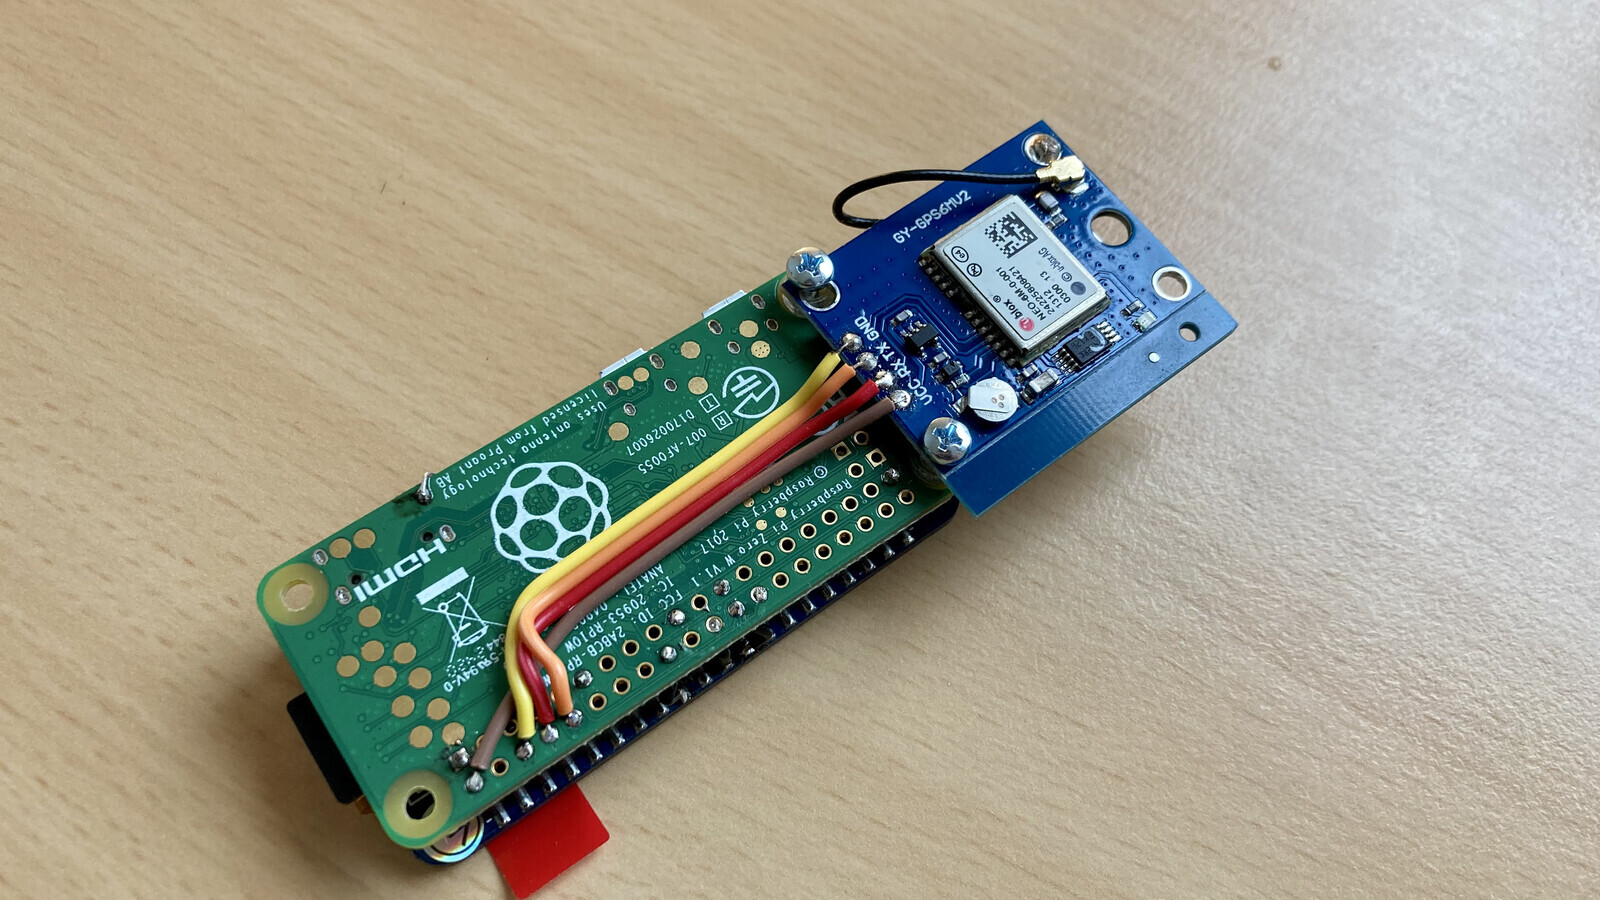
I’ve found several different wiring ways but I’ll share the one I choose and that it worked for me.
| Raspberry | GPS | Description |
|---|---|---|
| 2 (VCC 5v) | VCC | 5v VCC supply |
| 6 (GND) | GND | Ground |
| 8 (GPIO14) | RX | GPS RX data |
| 10 (GPIO15) | TX | GPS TX data |
The GPIO14 to GPS RX is completely optional and not needed at all. The GPS unit is autonomous and doesn’t need any command to start working, once it’s powered up you can read NMEA data from its TX pin.
Software configuration part one: Base setup for the GPS
First, you’ll need to disable the serial console on the Raspberry PI. Otherwise, it will conflict with the GPIO/UART pins (the Rapberry PI has a serial console you can connect to using a UART connection).
- Edit
/boot/config.txtand add or uncomment the following settings:enable_uart=1 dtoverlay=pi3-disable-bt dtparam=spi=on - Edit
/boot/cmdline.txtand removeconsole=serial0,115200so it ends up like this:dwc_otg.lpm_enable=0 console=tty1 root=/dev/mmcblk0p2 rootfstype=ext4 elevator=deadline fsck.repair=yes rootwait modules-load=dwc2,g_ether -
Reboot the Raspberry PI with
sudo reboot. - Now you’ll be able to cat the
/dev/ttyAMA0serial interface right with thepiuser, the output should look like this:
pi@robertgotchi:~ $ cat /dev/ttyAMA0
$GPRMC,181927.00,V,,,,,,,311021,,,N*79

$GPVTG,,,,,,,,,N*30

$GPGGA,181927.00,,,,,0,00,99.99,,,,,,*62

$GPGSA,A,1,,,,,,,,,,,,,99.99,99.99,99.99*30
Congratulations! Now you’re ready to start decoding NMEA data
Software configuration part two: gpsd and Pwnagotchi
Now that you have NMEA data right out of a socket it’s time to tie it up to Pwnagotchi. Although Pwnagotchi has out of the box GPS support, I had a very bad time scratching my head with the official gps.py plugin, here’s what I found:
- Bettercap never sees the GPS unit
- Display updates for the GPS coordinates were a bit weird/slow/not showing so I never know when the GPS unit is working or not, besides the Neo 6m status led blinking.
I ended up using this custom plugin and did a little bit of work over it to add some logging, Bettercap support (as the official plugin does) and date/time for the capture metadata.
- Install deps on Pwnagotchi:
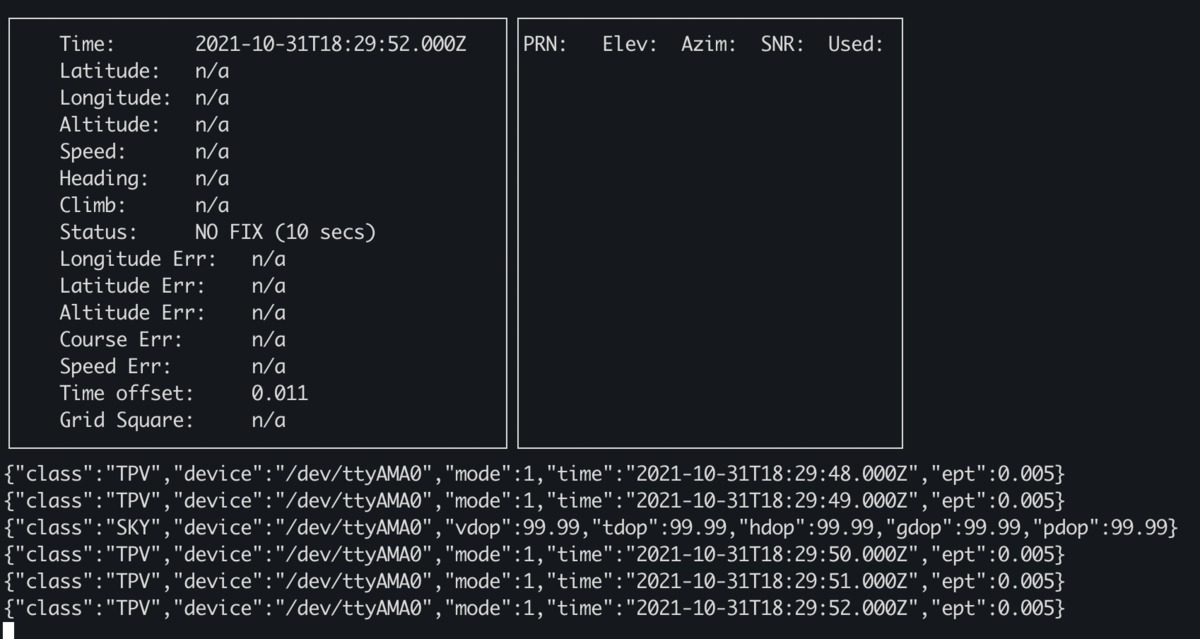
sudo apt install gpsd gpsd-clients
sudo pip3 install gpsd-py3
sudo bash -c 'cat > /etd/default/gpsd' << EOF
START_DAEMON="true"
USBAUTO="false"
DEVICES="/dev/ttyAMA0"
SPEED="9600"
GPSD_OPTIONS="-n"
EOF
sudo systemctl enable gpsd.service
sudo systemctl start gpsd.service
At this point you should be able to query gps data by using
cgpsor any other gpsd client
- Now it’s time to install the new gps plugin. On your computer, clone the repo and copy the
gpsd.pyfile right to the home directory of your pwnagotchi
git clone https://github.com/reynico/pwnagotchi-plugin-gpsd.git
cd pwnagotchi-plugin-gpsd
scp gpsd.py pi@10.0.0.2:
- Now in your Pwnagotchi:
sudo mkdir -p /usr/local/share/pwnagotchi/installed-plugins/
sudo mv /home/pi/gpsd.py /usr/local/share/pwnagotchi/installed-plugins/
And set it up on /etc/pwnagotchi/config.toml, adding the following lines to your configuration file.
main.custom_plugins = "/usr/local/share/pwnagotchi/installed-plugins/"
main.plugins.gpsd.enable = true
main.plugins.gpsd.gpsdhost = "127.0.0.1"
main.plugins.gpsd.gpsdport = 2947
- Now reboot the Pwnagotchi unit or restart the systemd unit. Check
/var/log/pwnagotchi.logfor the[gpsd] plugin loadedline:[2021-10-21 08:19:40,616] [INFO] [update] plugin loaded. [2021-10-21 08:19:40,621] [INFO] [webgpsmap]: plugin loaded [2021-10-21 08:19:40,622] [INFO] webcfg: Plugin loaded. [2021-10-21 08:19:40,624] [INFO] [led] plugin loaded for /sys/class/leds/led0/brightness [2021-10-21 08:19:40,627] [INFO] grid plugin loaded. [2021-10-21 08:19:40,651] [INFO] [gpsd] plugin loaded <<< here! [2021-10-21 08:19:40,639] [INFO] Session-stats plugin loaded. [2021-10-21 08:19:40,793] [WARNING] ui.fps is 0, the display will only update for major changes [2021-10-21 08:19:40,795] [INFO] initializing waveshare v2 display - Now you’re good to go with your new shiny GPS aided Pwnagotchi! Go outside and point the GPS antenna towards the sky. In a few minutes you’ll see a bright red blinking light on the back of the GPS unit: That means the GPS acquired lock from satellites. The display should be now showing lat/lon/alt data:
And now the .gps.json files will contain not only geolocation data but also date/time from the GPS unit:
pi@robertgotchi:~/handshakes $ cat TPLinkFAE2_84d8xxxxxxxx.gps.json
{"Latitude": xx.xx9020886, "Longitude": xx.xx7939513, "Altitude": 23.95, "Date": "2021-10-19T23:52:10.859507Z"}
Software configuration part three: Add GPS based data for NTP
You saw the date/time stuff on software configuration part two, right? And you may also know that the Raspberry PI units don’t have real time clock hardware, so each time you unplug them from the power the clock loses its time and you need to either reconfigure the clock manually o setup a NTP client against Internet servers to sync time again.
The NTP client part is the most common way machines have their clocks on sync, but Pwnagotchi is most likely an offline unit. BUT! We have that information right from the GPS satellites (-:
- Install ntp
sudo apt install ntp - Add a serial data reference to
/etc/ntp.conf(appended at the end of the file)# GPS Serial data reference server 127.127.28.0 minpoll 4 maxpoll 4 prefer fudge 127.127.28.0 time1 0.0 refid GPS - Enable and start the
ntp.servicesystemd unitsudo systemctl enable ntp.service sudo systemctl start ntp.service - Check if it’s working
pi@robertgotchi:~ $ ntpq -p
  remote           refid      st t when poll reach   delay   offset  jitter
==============================================================================
* SHM(0)          .GPS.            0 l 1739   16    0    0.000    0.585   0.000
That little * at the beginning of the SHM line shows that the clock is in-sync with the GPS data. You may not see the * for a while, take into account that the GPS unit needs GPS signal from the satellites first to sync time. Give it a try!
Last tweaks
My Pwnagotchi never goes into AI mode!
Been there too, seems like there’s some kind of regression in Pwnagotchi v1.5.5, I found that updating numpy solves the problem
sudo pip3 install --upgrade numpy
It’ll show some incompatibility messages between Pwnagotchi v1.5.5 and numpy > 1.17 but it works anyway
Move handshakes outside root homedir
This is useful when copying the handshakes files to your computer.
- In
/etc/pwnagotchi/config.tomlreplace thebettercap.handshakesline:bettercap.handshakes = "/home/pi/handshakes" - Move the handshakes folder:
sudo mv /root/handshakes /home/pi/handshakes
sudo chmod -R pi:pi /home/pi/handshakes
Happy hacking!